If you run your own website, it goes without saying that backing up your files and database is essential. Regularly doing a backup copy locally on the server might be adequate to avoid some kinds of disasters, but the best is to have an extra backup at a remote location. Amazon S3 is a perfect solution for this job. In this post, I will describe how to set up a Linux cron job to automatically back up your website and send a copy of the backup to S3 using the AWS command line interface (CLI).
There are several ways to interact with Amazon AWS, but the easiest one for this purpose is using their command line tool. The command line tool can be downloaded at http://aws.amazon.com/cli/. Follow the instructions to install the CLI on your web server.
The first step is creating an S3 bucket to store the backup files. In the AWS management console, head over to the S3 panel, and create a new bucket. S3 has a feature called Lifecycle Management which allows you to set up actions that will be automatically applied to objects in S3. One of these actions is deletion. This comes in handy, because it is normally not necessary to keep outdated backups around for too long.
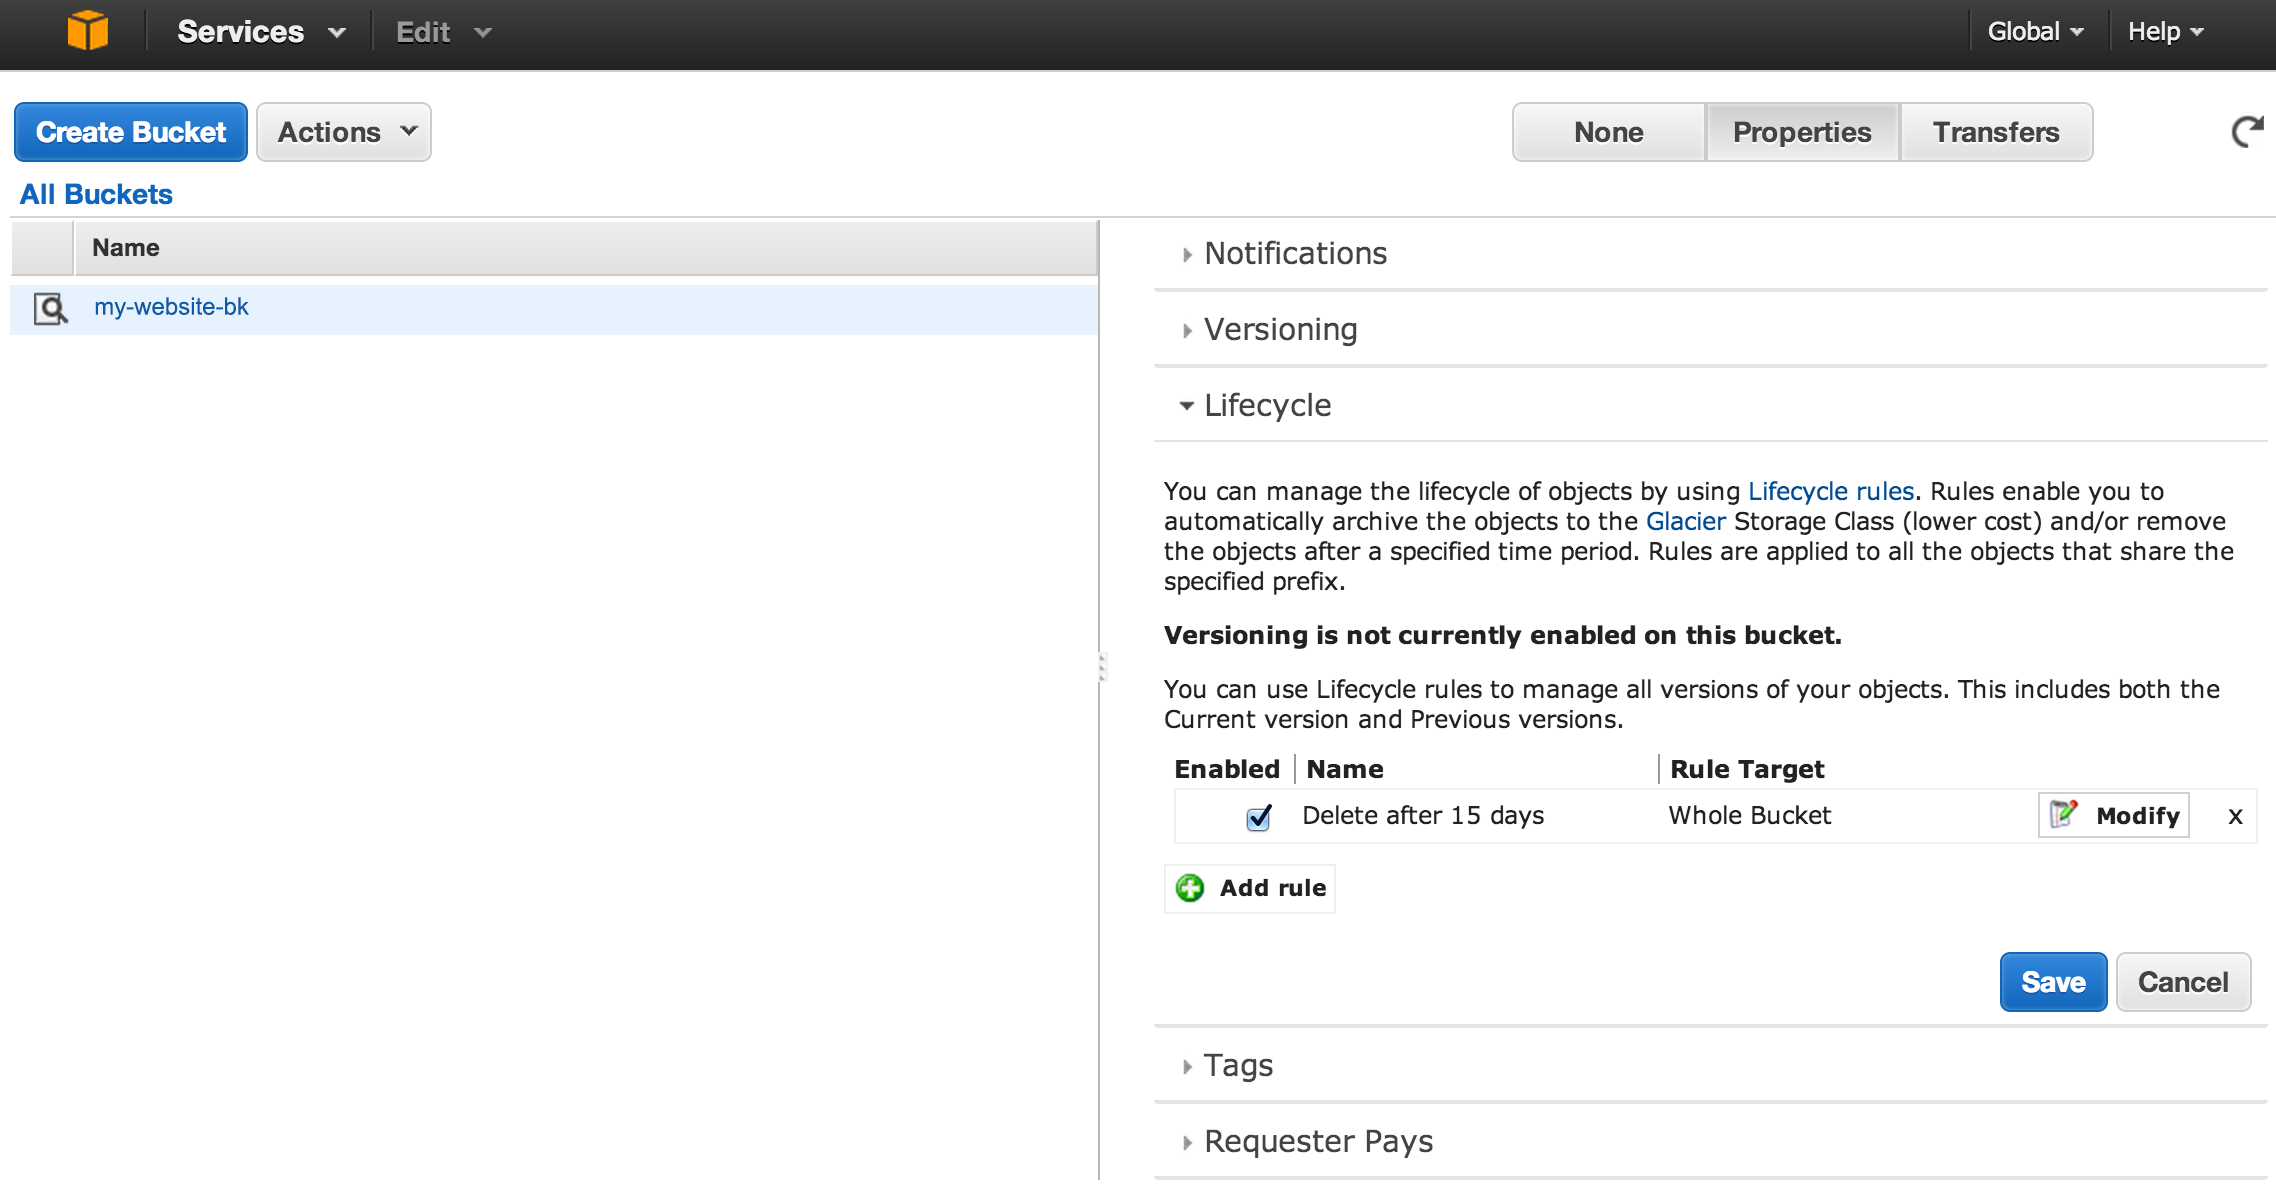
In the S3 panel, click the magnifying glass next to the bucket name to open the Properties window on the right. In the bucket properties, select the “Lifecycle” tab. Click "Add rule", and when asked, set it to apply to the whole bucket, and select the action “Permanently delete only”. Then specify the number of days after which you want the backups deleted. I set it to 15 days.
Next step in AWS is obtaining an api key for use by the CLI. This is done in the IAM (Identity and Access Management) console in AWS. Go ahead and create a new user, and be sure to note down the security credentials for the new user (Access Key ID and Secret Access Key). These will not be available once the creation dialog is dismissed.
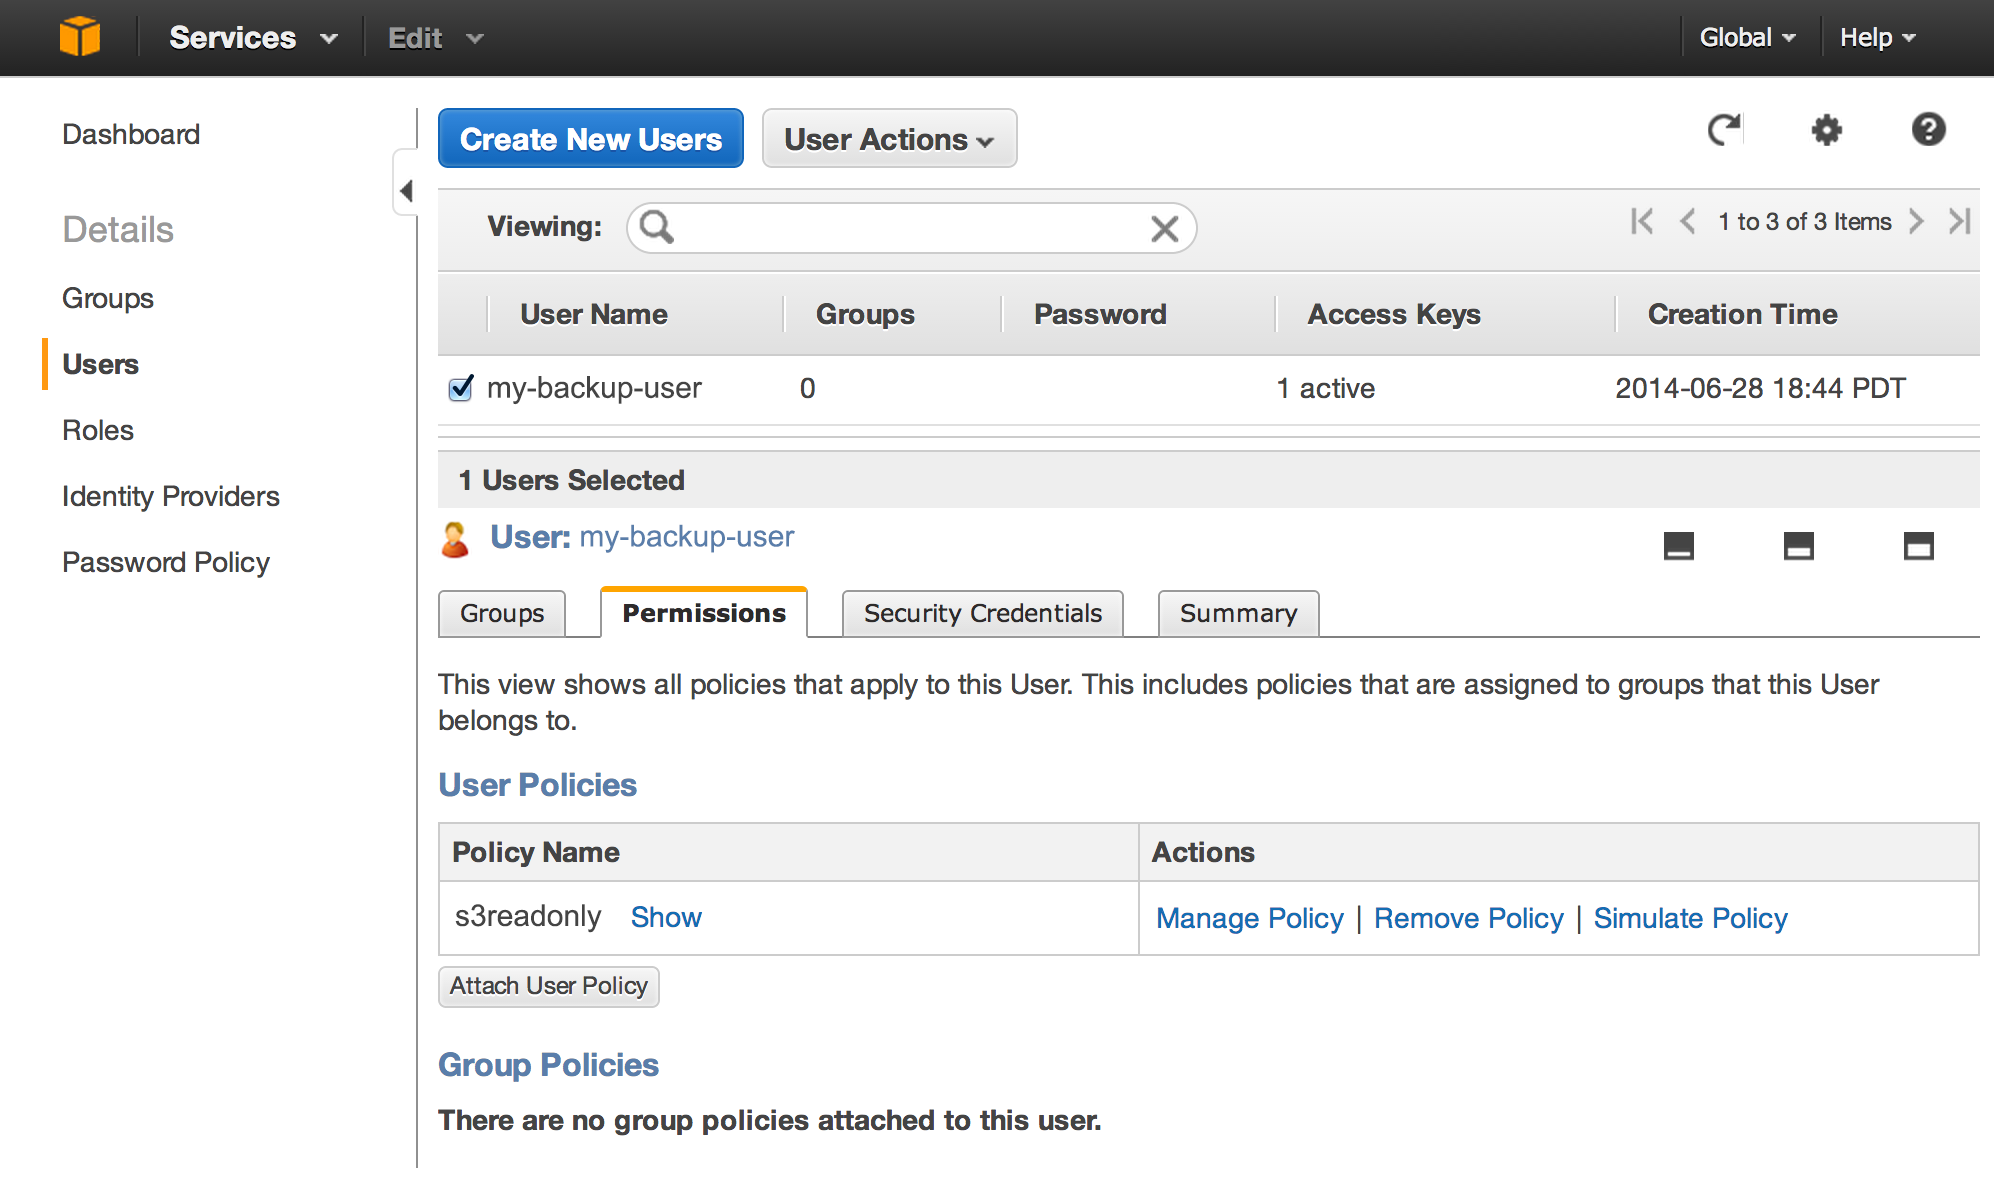
Select the newly created user, and select the “Permissions” tab at the bottom. Use the “Attach User Policy” button to set the user’s access privileges. There are some predefined policy templates that you can pick from, but in order to limit access as much as possible, select the “Policy Generator” option instead. This will let us fine tune the permissions.
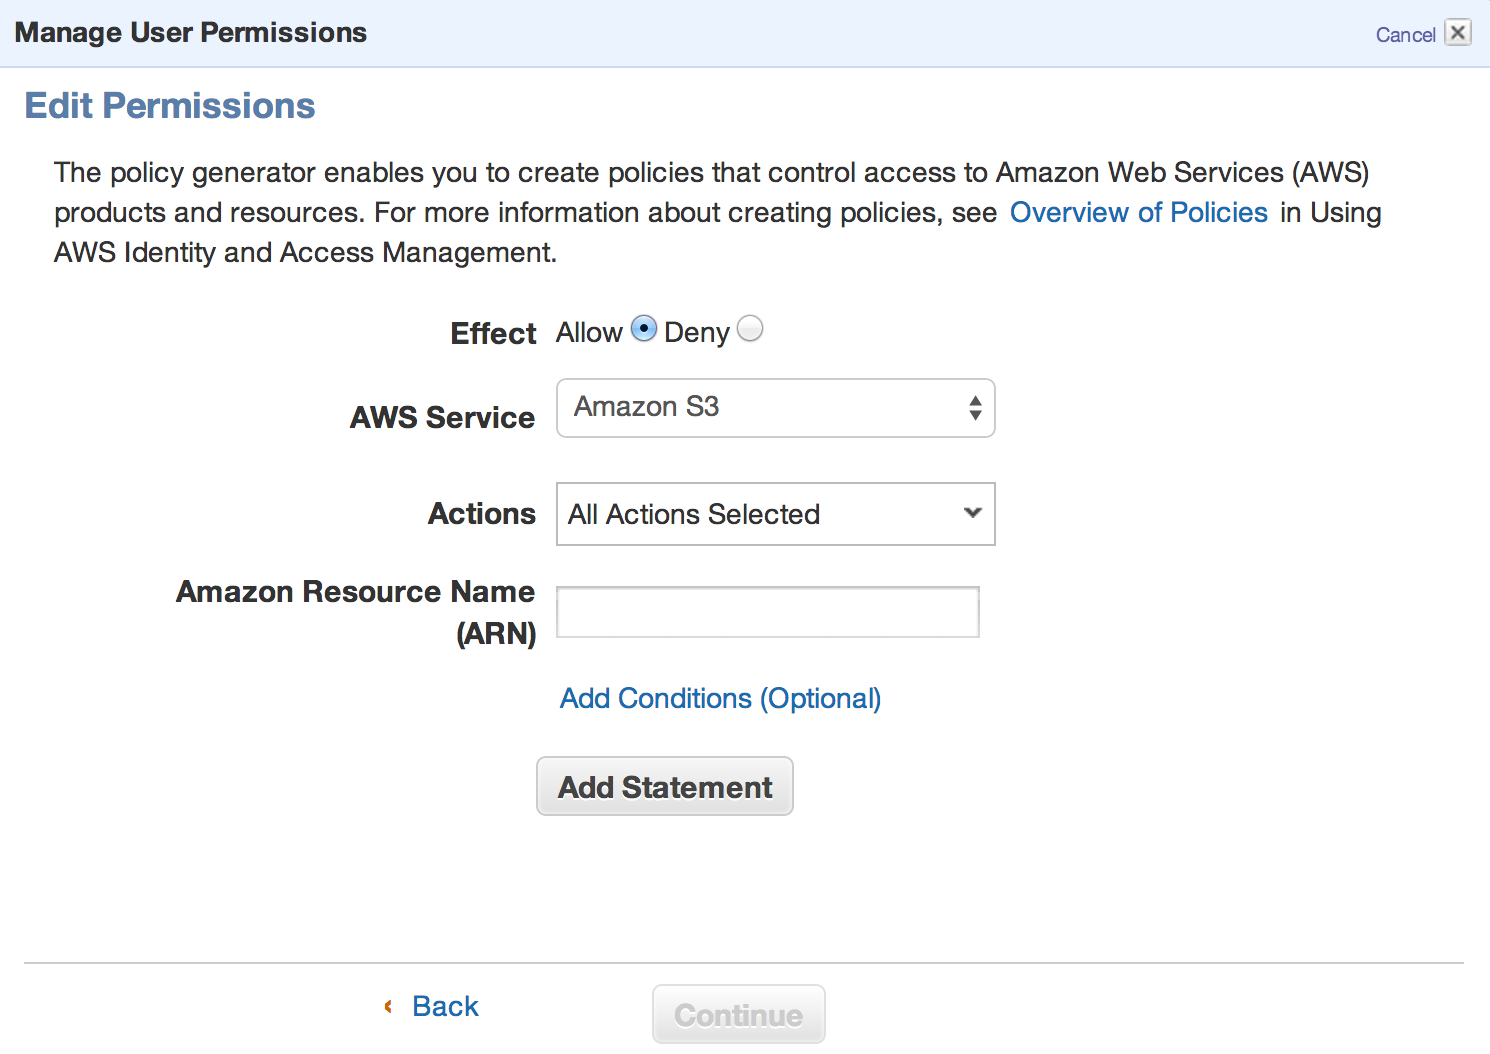
Select the “Allow” radio button, and in the “AWS service” field, select “Amazon S3”. In the actions field, select “All actions.” The “Amazon Resource Name” field is a tricky one. This expects an ARN string but it won’t help you much to determine the ARN of your bucket. Use the following string: “arn:aws:s3:::{bucket_name}/*”, but replace {bucket_name} with the name of the bucket you created. And we are done. This policy will allow the CLI user to perform any operation on the bucket we created for backups, and the access is limited to that one bucket. We will be shown a Policy Document that IAM generates based on the settings, which is just how IAM actually stores the permission settings. You can specify a name for this policy, say “s3readonly”, so that it can be identified later.
All is good in Amazon AWS. Now we need to configure the CLI. On the server, issue the “aws configure” command to set up the CLI. This will ask you a series of questions; most importantly, you will need to enter the access credentials. The output will look like as follows:
$ aws configure

AWS Access Key ID [None]: {enter your access key id}
AWS Secret Access Key [None]: {enter your secret access key}
Default region name [None]: {enter your preferred region}
Default output format [None]: {enter your preferred format}
If everything went well, you now should be able to upload files using the command below:
$ aws s3 cp file.zip s3://{bucket_name}
Now that we can upload to S3, all that's left to do is set up a cron job that backs up the files and the database, and sends it to S3. Below is the bash script I am using to do all this.
#!/bin/sh

# Database credentials
DATABASE="DBNAME"
USERNAME="DBUSER"
PASSWORD="MYPASSWORD"

# Directory to back up
SOURCE_DIR=/var/www/drupal/sites/default/files

# Target
TARGET_DIR=/var/local/backup
TARGET_BUCKET=mybackup-bucket

# Output files
NOW=$(date +"%Y_%m_%d_%H_%M_%S")
DB_OUTPUT=$TARGET_DIR/db.$NOW.sql.gz
FILES_OUTPUT=$TARGET_DIR/files.$NOW.zip

# Back up files
zip -r $FILES_OUTPUT $SOURCE_DIR

# Back up database
mysqldump -u $USERNAME -p"$PASSWORD" $DATABASE --single-transaction | gzip > $DB_OUTPUT

# Upload to S3
aws s3 cp $DB_OUTPUT s3://$TARGET_BUCKET
aws s3 cp $FILES_OUTPUT s3://$TARGET_BUCKET

# Remove files older than 14 days
find $TARGET_DIR -type f -mtime +14 | xargs rm -f
This script does the following:
- Makes a local compressed backup of the files directory of a Drupal site.
- Makes a local backup of the database.
- Uploads the two backup files it has created to S3.
- Removes the local backups that are older than 14 days.
Feel free to grab this script, and replace the credentials, source and target directories as needed. Log in as root, and save the script as backup.sh, and set the permissions on it so that only root can read it. It contains the mysql password after all.
$ chmod 700 backup.sh
Also set the permissions on the target directory so that only root can read and write it. The backups may contain sensitive information.
Test the backup by running it from the command line:
$ ./backup.sh
If the files appear in S3, we are good to go. To automate the backup and make this run periodically, we will set up a cron job. As root issue the following command to edit the crontab:
# crontab -e
Add the following line at the bottom:
0 22 * * * /path/to/backup.sh
This will initiate the backup every night at 10pm. Depending on how often content changes on the website, it might be necessary to run it more often, say 2-3 times a day.